A Saddle for Vic
A few months ago Vic gave Justin some
old saddles to send me so I could practice my skills at replacing the
leather. Well, last weekend I finally decided it was time to make
one for Vic in thanks for the dead ones he contributed. This is my
25th, counting failures.
I started by cutting a rough blank from
a piece of 'sole bend' cowhide, the thickest stuff you can get. It's
from Mexico. I then traced the exact pattern for a saddle onto it
and cut it out with a utility knife. It takes a sharp blade!
When I'm making a saddle, one of the
things that proves the most difficult is getting the leather
perfectly placed on the frame. I never know exactly why, but for
one reason or another the leather is often too far forward, or
backward, or off to the side, from where I want it. So to prevent
this, on the underside of this saddle I measured out exactly where
the rivets would go, and drilled the holes while the leather was
still flat and dry (this was a mistake, as we will see).
I then drew an ink line around 3/4”
from the edge of the leather, and attached the leather to a plywood
platform with sheetrock screws, one at the nose, two at the back.
This keeps the leather from moving around while I work on the back,
and therefore keeps the top from getting scratched up. I hold the
plywood platform in a portable workbench.
Next I beveled the edge of the leather
all the way around. The raw leather was about 5/16” thick, and I
beveled it from the ink line towards the edge, until the leather at
the edge was 1/8” thick. I did most of this with a wood rasp, then
tidied up the rough edges with a block plane and sandpaper, then
unscrewed it from the plywood platform and dropped the leather in a
bucket of clean cool water.
While it was soaking I took a 40-year
old Wrights W3N saddle (just like one of the ones Vic had sent me)
and pounded the rivets out of the decrepit leather. I and cleaned
most of the rust off the rails and cantle plate, greased the threads
on the tension bolt, and generally tried to make it look presentable.
A Wrights frame is just like a Brooks frame, but the nose piece on
the Wrights is painted black (a Brooks one is chromed) and the bag
loops on the Wrights don't have eyelets in them (a Brooks one does).
Four hours later, just before I took
the leather out of the water, it looked like this. You wouldn't want
to drink this water, trust me!
Now the real fun begins. This piece of
leather is basically flat, like a tortilla. But I want to stretch
the edge out without stretching the middle, so it takes a shape more
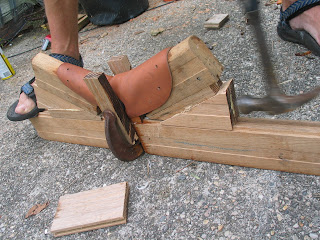
like a potato chip. To do this, I have made this jig from two layers
of red oak tongue and groove flooring.
I drape the dripping wet leather over
the top of this jig and clamp it to that center piece.
To clamp it,
I need to apply a lot of pressure in one place on the top, so
I can pull up the bottom without leaving marks anywhere else. So for
this purpose I am using two old plastic checkers that you may have noticed in the second photo, above. They are about 1
1/4” in diameter and have an interesting radial pattern around the
edge, but the interior is deeply recessed so it won't touch the
leather at all (though there is a cool crown design there). I clamp
the leather to the jig with a big C-clamp, more pieces of oak
flooring, and the two checkers. I made that C-clamp absolutely as
tight as I could.
Then I hammered in the wedges that you saw in the photo of the jig. It takes
the leather a little while to stretch, so I hammer the pieces in a
little from each side, wait a few minutes, and tap them in a little
farther.
When they are all the way in, it's time to let the leather
rest and stretch. Time to quit for the day!
In the morning I took the leather top,
still pretty wet, out of the jig. The checkers were deeply impressed
into the leather, so I had to pull them out. Holding the leather in
my hands, I used my fingers to form it into the shape of a saddle,
then attached it to the nose piece and then to the frame with
stainless steel bolts and wingnuts. My son took a bunch of photos while I did this, but they did not come out. Sorry!
These screws and wingnuts are not
really necessary at all; I could just go ahead and rivet it at this
point. But I prefer to do screws
for now, because they are quick and reliable. They let me get the
whole thing into the shape of a saddle quickly, so I can concentrate
on the fun stuff. This is probably the most fun part of the
process, because in a matter of minutes this floppy shapeless piece
of leather begins to look like a saddle. Pressure from my thumbs is
all it takes to curl the back down around the edge of the cantle
plate, and the front down around the nose piece. With a little
encouragement it takes back all the stretching I've inflicted on it.
It helps that this is the part of the leather that I shaved thin.
For several minutes I hold the saddle in my hands, pressing and
pushing and pulling wherever it seem necessary, forcing the wet
leather into the shape of a saddle. It won't be perfect; the
leather is still too wet to hold the perfect shape, but the better I
can make it now, the better it will be when finished. So I leave it
like this for a few hours, picking it up now and then to remind it of
the shape I want.
Meanwhile, I prepare the rivets. I buy
plain copper tinner's rivets, which have a fairly thick head on a
3/16” shaft. My anvil is a piece of a steel I-beam from some
construction project. I have drilled a 3/16” hole in this, that
holds a rivet nicely so I can pound its head thin. I place a rivet
in the hole in the steel beam, then beat the head of the rivet with a
hammer. The head starts out about 3/8” wide and more than 1/16”
thick, and I pound it until the head spreads out to almost double and
very thin. I'm not good at pounding them out flat; they always end
up a little lopsided and uneven. To fix this I put each rivet in an
electric drill and spin it against a file. This results in nine
rivets of all slightly different sizes. Hey it's a hand made
product, what did you expect?


We didn't get any photos of pounding
the rivets, but here you can see my I-beam anvil with three raw rivets
at the top, then five that I have pounded out flat, and three that I've filed. The hole, where I pound them, is at the lower
left.
The rivets have to be installed in the
right order. First is the one at the top of the nose piece. I
enlarge the hole in the leather with a tapered awl, push the rivet
through the leather and the metal, then pound a centering punch into
the end of the shat to spread it out as far as possible. I then
switch to a long punch with a flat end and give it a dozen or so firm
blows with a 3-lb ball peen hammer to mushroom out the end of the
rivet. By this time my son was tired of taking photos, so this step lacks documentation. Kids are spoiled, you know?

Anyway, the rivets on the side of the nose
piece are difficult. There's no way to pound them from the inside of
the nose piece, so I have to hammer directly on the head of each
rivet, holding the nose piece on the edge of the anvil, which is thin
enough to fit all the way inside the nose piece. Again, a dozen firm
blows of the hammer are enough to squash the shaft of the rivet into
a mushroom shape and embed its head into the surface of the saddle.
Then I install the cantle plate rivets. The first two, at the
center, are pretty easy, but the next two pairs are more difficult
owing to the saddle rails. One way or another you have to get the
punch on them and pound them several times.

When I got to the last two rivets on
this saddle, I realized the mistake of pre-drilling all nine holes in
the leather. The last two holes were in the wrong place, about 3/8”
in front of where I now wanted them. Doh! I drilled new holes and
went ahead with the project, but the astute observer will see the two
useless holes peeking from under the edge of the rivet. Too bad!
Will this cause any real problems? I just don't know. A true
professional, at this point, would take off the leather top and start
over. Well, there you have it: I'm an amateur.
Nine rivets in place, I return to
shaping the leather. Again I press the edge of the leather together
around the nose piece and cantle plate, allowing the leather to take
up any slack that may be left over from the violent stretching I
applied earlier. Every time I do this, I am amazed at how far the
leather will shrink where I want it to.
All the while, the leather is gradually
drying, and becoming better able to hold the shape I force upon it.
I have a nylon burnishing tool with which I polish the leather,
rubbing and pressing every inch of its surface. This compresses the
surface of the leather, making it hard and shiny. I rub away dents
and scratches by burnishing the area around them.
Finally I add some decoration. I
incise a line around the edge, and finally impress Vic's logo into
the medallions I stamped on the side. I did this with a flat bladed
screw driver. The leather is still pretty wet, and soft, at this point.
I also impressed my initials on the back of the
saddle. The artist must sign his work!
Monday evening, I burnished the top
some more, and then applied a mixture of beeswax and neatsfoot oil
into the top. This stuff goes on like a greasy paste, but by Tuesday
evening the leather had soaked up the oil, leaving a coating of wax
at the surface, A little buffing makes it all shiny and, we hope,
water resistant.
Wednesday, it was in the mail. Good luck with it, Vic! I'd appreciate if you'd post a photo of it every thousand miles or so.
Rudi


